What is cinemagraph?
It’s the trend for entertainment in 2016!
It’s a visual halfway between photography and video. The aim is to create an image in which only part of the image is moving.
Cinemagraphs are also known as “artistic gifs”. Unlike traditional GIFs, the fact that only a section of the image is animated gives a more poetic effect. Note that a cinemagraph is perfectly usable in an emailing platform.
A little history…
This technique was invented in America in 2011. It came about thanks to the collaboration of Jamie Beck (animation specialist) and Kévin Burg (photographer). The technique was first used for fashion shots during Fashion Week.
Multiple benefits foremailing:
. Capturing the reader’s attention : Well-executed design incorporates subtle, delicate movement, attracting the prospect’s eye without distracting or irritating him.
. Creates a more concrete context : The cinemagraph’s element of reality anchors the prospect in a real-life situation.
. Involving the prospect: If well thought out, this technique can really give the impression of witnessing the scene, and make the prospect want to buy your product or service even more.
Some examples : Going on a trip or buying a swimming pool with these types of cinemagraphs

Inemail marketing, including a cinemagraph can improve your click-through rate by 25% compared to a message without animation.
This technique is booming, and the number of companies using it is growing, but it is still rarely used in France for email marketing.
So including a cinemagraph in your emailing, communicating with your prospect in a different way, is a new approach to touching your target’s sensibility.
A few examples of use
For transactional emailing
In the SHODAZZLE example, the use of cinemagraphs makes a very basic image more appealing to prospects, their attention is less distracted and it’s as if we’re multiplying their intentions.

In the same vein, this can be used to entertain customers when confirming orders, thereby increasing your customer appeal. Or surprise a prospect with a welcome email, encouraging them to discover your brand and build loyalty.
For a product focus
A cinemagraph can be used to highlight a product among others.
In a prospecting campaign, this highlights the dresses and can make customers want to buy more.
Cinemagraphs as a corporate communication tool
It’s a great way to showcase your company in an attractive, modern way, as in the examples below.
Here is a gallery of images: http: //cinemagraphs.com/
A little technique
The integration of a cinemagraph is similar to that of any other visual element in an email campaign.
We need to take into account its place, its weight and how it is handled by the various messaging systems used by Internet users.
We advise you to place it in the first third of your message so that it can have the greatest possible impact.
Indeed, if your creative is placed in the middle or at the bottom of your email, the prospect may not pay attention to it, or even not see it if your message requires scrolling.
Ideally, for optimal display and good deliverability, the weight of your cinemagraph should not exceed 200Kb.
You should therefore pay close attention to the length of the video you use for the moving part of your illustration. If you want to integrate effects into your creation, be careful with colors and tints, which can sometimes add to the weight. Comarketing News
Please note that while most messaging programs support the reading of images, not all do, notably Outlook and Windows 7. In this case, the first image will be displayed as a fixed visual. So you need to have an impactful visual even if it doesn’t move, in order to reach your prospect.
As with all visuals, some messaging systems allow you to block the display of images. In this configuration, your creation won’t be taken into account by your prospect, so remember to include punchy text in your e-mail and use alternative texts on visuals that are missing.
Creating a cinemagraph
To make your cinemagraph, you’ll need a video with a fixed frame, ideally shot on a tripod.
Step 1
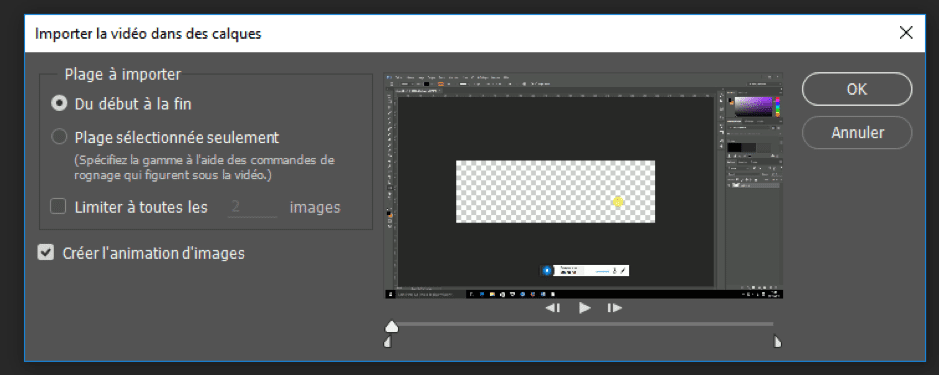
On Photoshop, import your video (file -> import-> video in slaps)
You will then have different options for choosing images:
- From start to finish: the number of images is limited to 500 (but we don’t recommend this option, as you’ll then have to manage a huge number of layers).
- Selected page only: this allows you to quickly select the sequence you’re interested in. To select it, move the sliders below the playback bar (circled in red).
Step 2
Open the editing window (window->edit), all images appear on different layers.

Delete layers you don’t need. This will reduce the weight of your document.
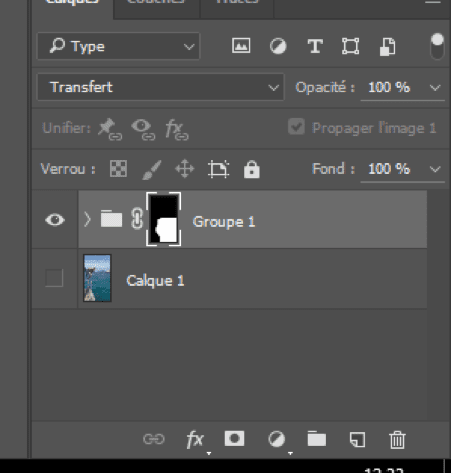
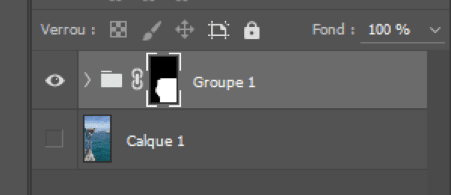
Step 3
Create a group in the layers section using the “folder” tab, then put all the layers in it except the first (which will be your base image).
Step 4
Once on your group, select the part you wish to move, invert the selection (selection->invert) and then hide it (layer->merge mask->hide selection).
Step 5
Then, in the editing bar, select all the images except the first, and in the layer section, make the first layer visible.
Step 6
Save your creation (file->export->save for web) in GIF format.
For the moving part of your image, take care to choose a continuous, fluid movement. There has to be continuity in the movement, so that you can’t see when the moving part returns to the beginning. Otherwise, your creation will lose its charm and look more like a GIF than a cinemagraph.
There are also online solutions, such as Flixel or Cinemagr.am, which allow you to quickly create your own cinemagraphs for a fee.
Find out more about emailing message creation.